Background image composite editing is one of the most effective ways or techniques used by photographers, graphic designers, and digital artists by placing two or more images to come up with a better-looking or, in fact, remarkable image.
This art enables unlimited imagination and can take almost any form, surrealistic scenery or a complex fairy tale scene. Hence, this technique can be used as a form of advertising, in digital art, photo manipulation, or even a novel.
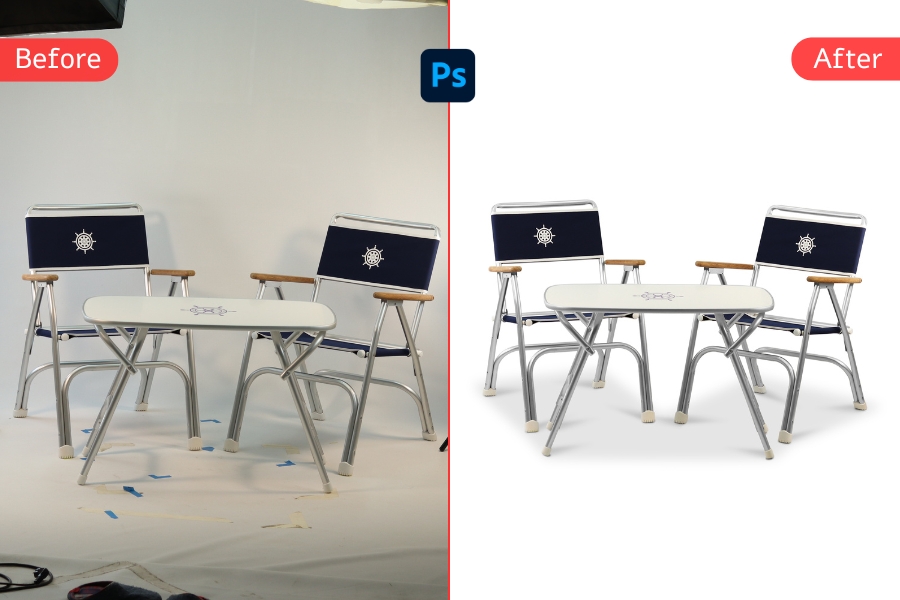
How to do Background Image Composite Editing in Photoshop?
Step 1: Plan your composition: It is the first step of the composite and focuses on what should be included in the plane. Before going into Photoshop, it is best to prepare the plan. Choose the idea, collect the materials for it, and think where each of them will appear.
Step 2: Open the base image: First of all, it is necessary to load the base image in Photoshop. This will be the main background or the primary component, the foundation upon which you will construct your composite.
To open an image, go to File then click on Open and select the base image from your computer.
Step 3: Import and arrange other items: Import any other images, which you require in the final piece of work. This can be done by using drag and drop the images into the base image document or clicking File and then Place Embedded. Move and position these elements with the help of the Transform tool (Ctrl +T on Windows and Command + T on Mac).
Step 4: Perform the Layer Masks: The layer masks are useful particularly in blending the images in a very right manner.
Choose the layer of the element you wish to blend and go to the bottom of the Layers panel and click on the Add Layer Mask button. Now with soft round brush paint black to cover some portion of the layer’s mask, this will subsequently reveal other layers that are underneath.
Step 5: Work on the lighting and color balance: To make all components match the defined light and color, experts at Background photo compositing editing use adjustment layers. Double-click Layer to open layer style and then, go to New Adjustment Layer and now you can choose options such as Brightness/Contrast, Curves, Hue/Saturation or Color Balance. To apply the adjustment layer only to the selected area, right-click the adjustment layers then choose the Create Clipping Mask option.
Step 6: Refine Edges: Most designs appear professionally done if raw edges of the elements used in the design are neatly finished. For this, choose the Refine Edge tool in the ‘Select and Mask’ option which enables you to alter feather, contrast, and smoothen the edges of your selection. Interestingly, this step helps you to blend elements into the composition more smoothly.
Step 7: Add Shadow/Highlight: To add some depth and make it all look more realistic, apply shadows and light. Bring a new layer below the active layer and choose a soft round brush and paint the black color for the shadow part and white color for the highlight. Adjust the opacity and the blend mode of these layers to get a realistic appearance.
STEP 8: Apply filters and effects: Add filters and effects that are best suitable for your composite. You can try the use of features such as Gaussian Blur to add depth, Lens Flare for lights, Camera Raw Filter to regulate the overall settings. These can be obtained from the Filter menu.
Step 9: Final Touches: After the general composition has been completed, make final adjustments and create a unified image. To add more detail and contrast choose Dodge and Burn tools and to perform general enhancement of color saturation, add a global adjustment layer.
Step 10: Save and Export: Last, but not the least Background photo compositing editing, always save your work in Photoshop format, that is, .PSD, so that all layers and masks are saved. Save the work by going to the File tab and then choose Export > Export As and then the preferred format (JPEG, PNG, etc.).
Conclusion
By image composite editing it is possible to create almost any effect. This technique is really inspiring and can be successfully used in a variety of projects. Thus, with enough practice and focus on the formal aspects one can achieve truly eye-catching and thought-provoking images.
Through the adherence of this guide and practicing with these tools and several techniques in Photoshop, you ought to be confident enough to conquer the beauty of image composite editing. If you need any help, reach out to Global Photo Edit. We offer background composite editing, industrial tools photo editing services, and many more different types of image editing services.
It depends on the type of work, like print purposes requiring a higher resolution of 300 DPI while the internet needs a low resolution of 72 DPI.
Yes, you can use smartphone photos but always make sure the images you use are of high quality and have enough light to blend with other components in the composite.
In your Background photo compositing editing, two things which should be controlled are direction and intensity of light. Use a soft brush to paint shadows and adjust the opacity for a natural look. After that, you can use soft brush to paint shadows and its opacity has to be adjusted to make it look natural.
Yes, you can use them but make sure you have the permission to use or else get a license to use any pictures that you intend to incorporate into your image especially in business use.
To save your current work click on file and then save; save your work as a. PSD file for editing and as a. JPEG or .PNG for final output, based on your necessities.

Related Posts
- - How to Edit Product Photos for White Background on a Cheap Budget?
- - How to Choose the Best Clipping Path Service Provider?
- - How to Create a Clipping Path in Photoshop?
- - How to choose the best clipping path service?
- - How to Cut Out Hair in Photoshop?
- - How to make a transparent background in Photoshop